Tuesday, September 25, 2012

Teal Tuesday: 3 Color Mani

Hello Ladies!

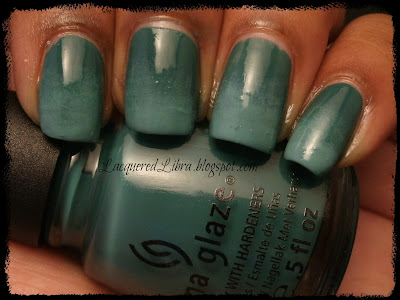
Today's Teal Tuesday mani is pretty straightforward.  Three colors, at least one of the teal.  So I tried a tape technique that I've seen around the nail community.  The look was very easy to achieve and I see more of these mani's with different colors in my crystal ball.


I started off with Sinful Colors Black On Black for the base color.  Then I brought out my beloved China Glaze Bohemian's.  I used Deviantly Daring and No Plain Jane, one coat of each.

 
I included this last pic to hopefully show off the duochrome finish.  You can see that Deviantly Daring shows up more blue on the index and middle fingers, and more green on the other two. 
 
Thanks for stopping by.  Happy Polishing!
 

Monday, September 24, 2012

Nouveau Vintage + BM 314

Hey Lacquer Lovers!

Fall is in the air and I cant wait to dive into all of the rich, deep colors of the season!

The nails that I have for you today were originally done for the AIS Stamping Sunday challenge, but I did not have time to post them.

I used a beautiful metallic color from Studio M called Nouveau Vintage.  As some of you may know,  Studio M is made by the same folks that do Color Club and the polish names and colors are identical.  I get my Studio M polishes from Meijer and the cost less than the Color Club versions.


These pics show two coats of Nouveau Vintage.  This is such a unique color, like pewter, bronze, olive, and brick all wrapped up into one.   I wanted to see what it would look like matified, so I use Hard Candy Matt-ly In Love on the ring finger. 


For the stamping, I used Silver Sweep (SHID) and BM 314.

Thanks for checkin' me out.  Happy Polishing!

Thursday, September 20, 2012

Orange and Gold Ruffian

Hey Lacqueristas!

Got a quick post today for you today. I just wanted to share with you some nails that I did for a wedding that I attended last weekend. I did this mani to match my dress which was a burnt orange color with a gold belt, and the colors matched the dress perfectly.


The colors the I used were Maybelline Color Show in Bold Gold and Zoya Myrta.  The second picture is the most color accurate.
 
Thanks for checkin' me out.  Happy Polishing!

Tuesday, September 18, 2012

Teal Tuesday: Something Sweet

Hello my Lacquered Lovelies!


It took me a while to figure out what to do for this theme because in my mind teal and sweets just don't mesh. So I decided to try my hand at the spun sugar technique.


It actually looks pretty good IRL, but with the macro settings the pics look like a lumpy, bumpy mess.  I know that this kind of nail art is supposed to be textured, and that's what I like about it, but I could really do without the big globs.   Also, this method is very time consuming.  With the waiting for the polish to get stringy, it took about 10 minutes to do one nail.

Now on to the polishes.  For the base, I used 2 coats of Zoya Wednesday.  For the lines, I was going for a gradient look. I used (in order from the cuticle up) Zoya Zuza, Sally Hansen Insta Dry Blue Streak and Sinful Colors See You Soon.

Have you tried this technique before? 

Thanks for checkin' me out.  Happy Polishing!

Check out the other ladies participating in Teal Tuesday.

Sunday, September 16, 2012

AIS Stamping Sunday Challenge: Falling Leaves

Hello All!

I think I'm just gonna get this post done before it is no longer Sunday.  This week in Adventures in Stamping our theme is Falling Leaves.  I'm so ready for this time of the year.  In the evenings the temperature feels fall-ish here, but it's warm and sunny during the day. The leaves haven't started to change yet, but I can make definitely make that happen on my nails!

Orange-Brown-Gold
 
For the stamping, there were several plates and polishes that went into making this mani happen.  So I'll give you a rundown of the image plates first.  We have:
 
BM 19 & BM 04 - index finger
RA-118, RA-121 & BM 03 - middle finger
BM 04 & BM 03 - ring finger
BM 19 &  RA-115 - pinky finger
 
Now on to the polishes:
China Glaze Agro
China Glaze Unplugged
Avon Bronze
Avon Copper
Kleancolor Metallic Orange

For the base of this mani, I used 2 coats of China Glaze Heaven. I'm kinda on the fence about this polish.  I like the color, but it seems kinda patchy on my nails, and as you can see there is a bit of VNL.  One more coat would be needed if I were to wear this polish on its own.
China-Glaze-Heaven

Thanks for checkin' me out.  Happy Polishing!

Thursday, September 13, 2012

Dupe or No Dupe: China Glaze No Plain Jane -vs- Nicole by OPI Iris My Case

Hi Ladies!

As I was going thru my stash a while back, I was amazed by how many polishes that I have that are possible dupes.  Well, I guess I shouldn't be that amazed, I mean I do have over 400 polishes. And I just keep adding more. 

So today, I'm gonna compare two of my newer pretties China Glaze No Plane Jane and Nicole by OPI Iris My Case. 

China-Glaze-No-Plain-Jane-Nicole-OPI-Iris-My-Case
 
They look just about identical in the bottle, and it also carries over to the nail. In the pictures below, I have on three coats of each with no topcoat.
 
China-Glaze-No-Plain-Jane-Nicole-OPI-Iris-My-Case

China-Glaze-No-Plain-Jane-Nicole-OPI-Iris-My-Case
 
Iris My Case has a slightly thicker formula than No Plane Jane.  Both polishes have decent dry times. I do prefer IMC only because I like the wider brush. I feel like I have more control over the polish and it's easier to get a nice line down near the cuticle (which makes for less cleanup).

Verdict: Dupes!!

Which one do you have in you collection, or do you have both?

Thanks for checkin' me out.  Happy Polishing!

Tuesday, September 11, 2012

Teal Tuesday: Geometric


Hey Lacquer Lovers!

Today I have a Teal Tuesday mani for you. It has been a while since I participated, but I'm trying to get back in the swing of things. This week the theme was to do a mani based on a geometric design or pattern.  So let me show you what I came up with. 


First, I did a gradient with China Glaze Exotic Encounters and Zoya Wednesday.  For the stamping, I tried to find a design that would cover the full nail, but let a good amount of the base polish show through.  This image comes from the Bundle Monster plate 322.  The stamping polish is Sally Hansen Lickety Split Lime.  Usually I like the Sally Hansen Insta Dry polishes for stamping,  but this time it did not come out as opaque as I would have liked. 

So I also have a picture of the gradient before the stamping.

Zoya-wednesday

Check out the other ladies participating in Teal Tuesday!

Friday, September 7, 2012

My First Guest Post!

Hey Lacqueristas!

Today my first guest post is up over at Mandy's Polish.  I am so excited to be featured on her blog.  She does some great mani's. So if you haven't already head on over and check out my guest post and shoe her blog some love.

http://mandyspolish.blogspot.com/2012/09/guest-blogger-friday-lacquered-libra.html

Thursday, September 6, 2012

China Glaze Bohemian Collection Water Marble

Hey Ladies!

Lately, I had been trying to think of a way that I could use all of the China Glaze Bohemian colors in one mani.  So water marble it is. You can see swatches of all the colors here .  I'm somewhat pleased with how this turned out.  Not because of the polishes, but because of my technique.  I was rushing because I was sleepy, but I know if I had taken my time, the design would have been better.

I used Kleancolor Black as the base for the water marble.  Each of the Bohemian colors was used (dropped in the water) once.  I think these may be the easiest colors I have water marbled with so far.  I had no problems with the colors spreading, although you have to work quickly, because they dry fast.  The end result reminds me of an oil slick.


China-Glaze-Unpredictable-Water-Marble
Left hand with China Glaze Unpredictable


China-Glaze-Swanky-Silk-Water-Marble
Right hand with China Glaze Swanky Silk


For some reason, my thumbs always seem to have the best designs when I do a watermarble.
 
Thanks for stopping by.  Happy Polishing!


Sunday, September 2, 2012

Layered Stamping: BM 208 + BM 312

Hey Lacqueristas!

The mani that I have for you today was done for Adventures in Stamping.  This Sunday's theme was something that you have learned from the group.  I have seen some of the ladies layer full nail images over one another and I loved the effect, so that's what I'm gonna show you today.  I have done layering before, usually with a full nail image for the base with one or two of the smaller images on top, but never two full nail images together.

So for this mani, I started with Kleancolor Pearl Jungle over basecoat.  Pearl Jungle is a gorgeous seafoam green with a glass fleck finish. Then I stamped the first image, BM 312, with Zoya Tracie.

BM-312-Kleancolor-Jungle-Pearl-Zoya-Tracie
 
I really like the effect of this image.  I kinda looks like brushstrokes.  Next, I stamped BM 208 with Kleancolor Black. 
 
BM 208-Jungle-Green-Zoya-Tracie
 
 
All together I think I looks like shattered sea glass.  What do you think? 
 
Thanks for checkin' me out.  Happy Polishing!

Saturday, September 1, 2012

Classic French + One Stroke Flower

Hey Lacquerheads!

Today, I could not decide what I wanted to do with my nails, so I decided to keep it simple and do a classic french manicure.  This is the first time that I did a pink and white french without the tip guides and I think that this was much easier.  I never cared for the way the my french mani's turned out using the tip guides, because there was always some polish that managed to seep under the guide even though I would press it on the nail as thoroughly as I could.  Then when I took the guide off, the base polish would come off with it.  I guess that could be due to rushing, and of course this was before I discovered the one and only Seche Vite.

So let me get on with it and show you how I did it. 

First, I painted my nails with basecoat.  Lately, I have been using Sally Hansen Triple Strong Nail Fortifier. I used it before many years ago,  but let me tell you, I'm loving this stuff right now. I haven't had any breaks since I started using it (and I did yardwork today, so that's saying alot!).

Next, I used Sally Hansen Insta Dry in Whirlwind White to pain the tips.  I wasn't being all careful like and trying to pain perfect smile lines. I simply painted the tips the same way that I would paint the rest of my nails. 
 
I know it looks messy, but here's where the acetone comes in. I used the same brush that I use for cleanup, dipped in acetone to "erase" the polish and make the smile line.  Then I used Orly Beverly Hills Manicure in Beverly Hills Plum from the cuticle up to the smile line.  Topped it all off with Seche Vite.


And you know me...Gotta add something extra. This was too "Plane Jane" for my taste. So I tried my hand at a one stroke flower.  I'm happy with how the flower came out for my first time, but the squigglies left a lil something to be desired.


I used acrylic paints by Americana, Lavender and Snow White for the flower, and Lamp Black and Snow White for the squigglies. 
 
 
Thanks for stopping by, glad to have ya!  Happy Polishing!